Cell Phone Photography
 Horseshoe Bend, Arizona (pix by andreas)
Here are several tips on how to take better photos with your cell phone. Each camera is slightly different, but they generally have the following settings. I've sorted these tips by best/easiest first.
Brace Your Camera Against Something
If there's a tree, door, sign, or whatever, place the edge of your phone against it to steady the camera. You'll get a better photo.
Use the Volume Key or Voice Control
If you can, use voice control instead of clicking the camera button. Voice control lets you hold the camera steady and say "cheese", "smile", or similar to take the photo.
A Microfiber Lens Cloth
It's very easy to get fingerprints on your camera's lens. A friend was taking photos and I looked the pixs, but they were very cloudy. She said, "well, it's an old phone". She had never cleaned her lens. I used a microfiber lens cloth to clean her phone's lens. Bingo. Better pixs.
Use Grid Lines
You can improve your photo layout by turning on the grid lines. This divides your screen with several lines. When you take a photo, place the main subjects on those lines or at the intersection of the lines. For centuries, painters have used the Rule of Thirds for layout. It really works.
Size of Photo
The larger the photo, the higher the quality. Set your phone's camera to the largest possible size. I use 4032x3024 (4:3) (12MB). If you use a smaller size, it has less detail, blurred colors, and is grainy.
If you take hundreds of photos, you could fill up your phone. You can either buy an internal storage card (64GB for $20 will hold over 12,000 photos; get one at most camera stores, Walmart, drugstores, etc.) or delete unwanted photos every night.
Try the Filters
When you look at your photos in your cell phone's photo gallery, you may see that you can edit your photos. This includes filters. You should try these filters. They can improve the colors in your photos.
My phone has about 12-15 filters and I can download more. But most of these filters are useless or the effect is minor. Pick a good photo with your friend's face with lots of outdoor background and then select each filter, one by one. Write down the filters that you like and delete the rest (you can always download them again for free). I like the following filters: Auto (it nearly always improves colors and contrast), Classic (for black and white), Evergreen (stronger colors for vegetation), Sunshine (brightens up a dark photo), Sharpen, Light Flare (adds a light flare), and Sketch (turns your photo into a pencil drawing). Every cell phone may have a different set: try them all.
Crop Your Photos
Use Crop to remove extra space around your photos. You can focus on the main topic of your photo.
Use HDR
HDR (High Dynamic Range) is one of the best settings for your digital camera. When you look at your living room, your eye automatically balances light and darkness so bright areas near windows are darker and dark areas in corners and under the sofa are lighter. But ordinary cameras can't do this, so if you take a regular photo of your living room, the corners will be both too bright and too dark. HDR fixes this by darkening the bright areas and lightening up dark spaces.
Take a photo of your living room (or any large space that has a bright window and dark corners) with HDR turned off and another with HDR turned on. You can see the difference. Cool, no? I leave HDR turned on all of the time.
AWB White Balance
Generally, you leave white balance set to Auto (AWB = Auto White Balance). You can set this to Auto, Daylight, Cloudy, Incandescent, or Fluorescent. You should experiment with this.
- If the day is cloudy in any way, try the Cloudy setting. It'll brighten up the colors in your photo.
- If you're in a home or restaurant, the lights are likely incandescent (old-fashion light bulbs), try the Incandescent setting.
- When you're indoors in a mall, an office, a supermarket, or similar that uses fluorescent lights (the long tubes), try the Fluorescent setting.
Use a Clip-on Wide-Angle Lens
I strongly recommend a clip-on lens for your phone. Just clip this over your phone's camera lens and you have 140-degree wide-angle. The following are all 140-degree 45X lenses. You can buy these at Amazon.
- TECHO Universal Professional Lens Kit $17 (w/caps)
- Aukey Ora macro lens $25 (w/ caps)
- There are dozens of wide-angle lens by now. Make sure it fits your cell phone.
I prefer clip-on lenses (instead of magnetic, sticky, etc.) because they're easy to attach/detach and when you're not using it, you can clip it to your baseball cap's bill, your jacket, your backpack strap, and so on. I have the Techo Universal. Whatever you get, be sure it has lens caps on both sides. Fingerprints can ruin your photos.
I've bought four TECHO lens so far and given them as gifts to friends who like to take photos with their cameras.
 Lower Antelope Canyon, Arizona (pix by andreas)
Take Macro Photos with the Clip-on Wide-angle Lens
Both of the wide-angle lens above let you unscrew the lens to turn into a macro lens for close up photos. You can take super close-up photos of flowers, bugs, whatever.
Don't Use Zoom
If you use zoom, the image quality goes down. Take the photo and later, use your photo editor to crop and zoom.
Use a Telescope for Zoom
I hold a small telescope against the front of the camera lens. It's a bit awkward, but it works.
Two Things to Have
- Selfie Stick: Use this to get unique angle on your photos.
- Lens Cloth: You need a microfiber lens cloth to clean your camera lens. Get a microfiber cloth at any optometrist or pharmacy.
See Your Photos
It's very easy to take several hundred (or several thousand) digital photos. But it's a pity if you don't see them.
We bought a 14" digital frame (Aluratek 14", 4GB, with remote). 4GB of memory holds about 4,000 photos. If you set it to random rotation at ten seconds per photo, 4,000 photos will fill 11 hours.
I suggest you buy the largest possible frame (14'-18") and at least 2GB of memory. Hang it on the wall and you'll constantly see photos that remind you of trips, events, dinners, friends, and family (and pets, of course!)
A Few Tips for Composition and Layout
Get CloseGet close to what you're photographing. Fill the screen.
Pay Attention to Light
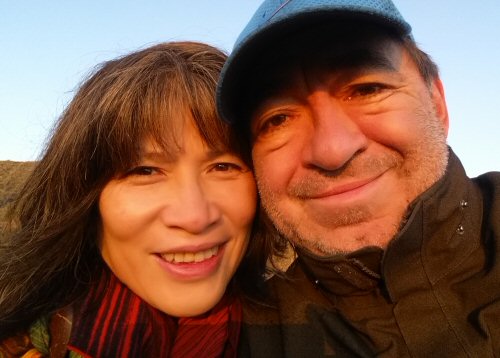 Us on the shore of Mono Lake at sunrise. We got up just before sunrise, hiked out to the lake, and waited for the first rays to each us. The image hasn't be edited, filtered, etc.
Photos of Children and Animals
 By getting close, you can see the colors and details in the cat's eyes.
Don't take photos from above. Get down to your subject's eye level. And get close. It was sundown, which added light tan colors to the cat's white fur.
Can Cell Phones Take Good Photos?
Yes. Here are pixs from Sony's World Photography 2015. See more cell phone photos at MobilePhotoAwards.com